
A rich, flavorful ragù with incredible slow cooker flavor in about half the time

In this recipe
- Build a taste base
- How to make pasta sauce the right way
why does it work?
- Powdered gelatin adds body to sauces.
- The pressure cooker tenderizes meat and adds flavor in less than half the time it takes to make a traditional barbecue or bolognese pie.
There's something in the air, and I don't know what it is. In fact, I know exactly what it is. These are the tiny seeds of beef and pork. These are aromatic compounds that jump out of the pot into the atmosphere and hover around my house. It's terpenes and esters from boiled red wine, sulfides from onions and garlic, and falcarindiols from carrots heading for my nose. That's the smell of bolognese stew in my kitchen, and each year it marks the beginning of winter for me. A winter filled with greasy sauces with velvety textures coats my pasta and warms my soul.
I didn't really follow what caused me to pull out the oven and start mincing the meat year after year - it could be the changing weather, the lack of summer fresh produce or maybe the display of decorations. Christmas. will increase right after Halloween, but ragù bolognese is the only thing I will make year after year, like clockwork. Luckily, I love the tool.
My original recipe is based on a version I learned from Barbara Lynch when I was a chef at 9th Park in Boston. It's complex, with four different types of meat (lamb, pork, veal and chicken liver), sautéed with onions, carrots, celery, garlic and sage, then simmered with broth, wine, and sage. Red wine, milk and some tomatoes for a few hours, and finally finished with heavy cream, parmesan and herbs. Over the years, my formula has evolved as I play with it. My version of the book uses pancetta to further enhance glutamic and inosinic acids, providing a bit of depth of flavor. On the other hand, this low-temperature oven version amplifies the Maillard reaction and creates a salty and golden flavor. During my epic pressure cooker testing, I decided to see if I could adapt the recipe to work in a pressure cooker, in the hopes of reducing cooking time while building flavor in the process. .
It took a bit of tinkering, but in the end it worked extremely well, creating Ragù Bolognese with an amazing slow-cooking flavor, in just about half the time compared to my other recipes. I.
Build a taste base

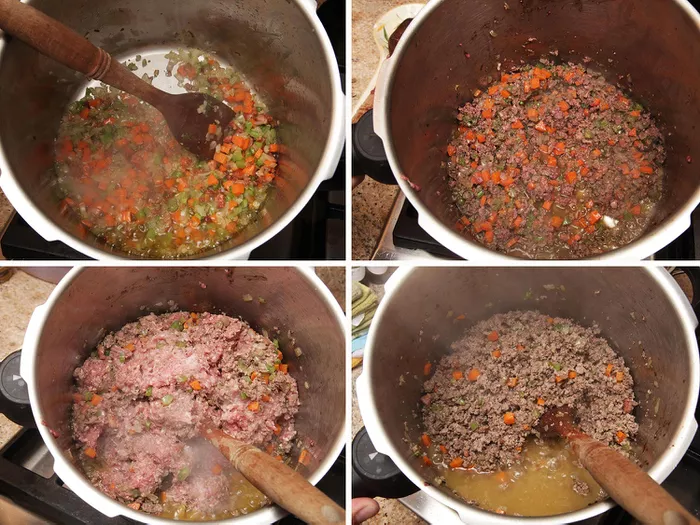
The first steps of this method are very similar to the pinnacle generation of my a la bolognese regimen. I started by making small pancetta pieces. In my all-oven version, I'm careful not to brown the pancetta any longer, as this helps maintain the velvety texture - the sauce takes on a golden flavor when baked in the oven. In this version, the sauce won't be covered in dry heat, so I wanted to get the golden flavor early by letting the pancetta cook the dinner until it was crispy enough. The resulting softening of the pressure cooker will reduce any unwanted texture it creates. Then I loaded up my herbs: onion, carrot, celery, garlic, sage, and chopped parsley. (I'll also add some chopped parsley and basil at the end for extra flavor.) I cook these for dinner until tender in the pancetta fat before adding the chopped liver chook.
I'm often asked if chook haters really need it, usually by liver haters. I'm no longer a liver fanatic myself, but I love what it does to the dish, which includes the minerality and definitely enhances the nuttyness of the red meat. Livers aren't 100% necessary, but I'd recommend trying them if you're not afraid - even using half the amount listed would help. After the liver lost its deep purple color, I loaded the rest of the meat in. The combination of lamb, pork, and veal used by Barbara Lynch is excellent, especially since veal contains a lot of gelatin to keep things high quality and velvety smooth. The problem is that veal can be hard to find and expensive. I choose to use a mixture of identical lamb, red meat and pork items, or possibly red meat items for at least one pork item. We will deal with the gelatin shortage problem later.
At this point, in my all-oven-based recipe, I fully cook the meats until they lose their fresh color, but now not until they start to brown - once. more for the purpose of keeping them sweet while preparing dinner. . I tried using this technique in a pressure cooker, and the result was too much liquid (Bolognese soup, anyone?). Instead, for this pressure cooker model, for dinner I cook beef until all of its liquid has evaporated and it begins to sizzling in its own fat. It takes about 20-30 minutes, but most of the time is unattended, except sometimes annoying. You'll hear beef being cooked as the sound changes from bubbling water (think: witch's cauldron) to the sizzling sound of frying (think: witch soaking in hot oil).
Another reason you might want to reduce that amount of gravy: you'll add a little more liquid. First, I load up the glasses of dry red or white wine, then let it cool completely before adding 14 oz. crushed tomatoes (you can use the awesome crushed tomato icon like Cento, Muir Glen, or Bianco DiNapoli, or you can start with peeled and hand-crushed tomatoes), one cup millet chook in which I dissolved one oz of powdered gelatin (that's 4 x 0.25 ounce packets) and a cup of heavy cream. While my other recipes start with milk and put the phone in to make it easier to add the cream at the end, with this model of the pressure cooker and the limitations it poses to ease - the pot Pressure doesn't allow moisture to escape as vapor - starting with a targeted supply of extra milk protein and fat becomes the right decision.

Then I opened the lid, put it under overpressure (12-15 psi is what you're looking for) and let it cook dinner for 1/2 hour. When you toss and open the lid, you are first greeted with a wonderful aroma. You will find the sauce near the bottom of the pot is quite thick, the top is bubbly; when you stir, everything will clear up and start coming back together. Once the lid is opened, it will take another 30-45 minutes to subside, during which time you may see a red grease stain starting to form on the surface. Don't worry, everything will emulsify in the sauce as you reduce and stir. (No one said Bolognese ragù turned into exercise food.)

As it begins to evolve into its newest form, it may be time for some last-minute additions. I add a generous amount of healthy grated parmesan cheese, which not only adds flavor but also helps emulsify the sauce. Some finely chopped parsley and basil are also added to the pot, along with a final sip of cream and some fish sauce, to enhance the flavor of the dish.
This dish is so delicious that I sometimes get distracted from cooking the noodles as I hover my mouse over the pan with a spoon, tasting sample after sample. Of course, to get the right seasoning.
How to make pasta sauce the right way
No matter how carefully you mix the sauce, it only matters if you a) don't use the right kind of pasta, b) don't prepare the pasta properly, and most importantly, c) don't combine them at all. 2 the same right way. Street.
Choosing the right paste is the clean part. For a hearty sauce like bolognese, you need either wide, long, flat pasta (including tagliatelle or pappardelle) or quick pasta with lots of ridges to form the sauce (including pasta) , rotini or penne rigate). If you are suggesting to use long and flat pasta which is an event then you should definitely try the brilliant ones.
Fresh pasta has a coarser base so the grip of the sauce is higher. Likewise, domestic manufacturers of imported or dried pasta can be trained with brass extrusions, rather than the modern Teflon liners used by inexpensive pasta makers. . Brass extruders are slower and harder to paint, but produce pasta with a coarser, taller bottom to get that sauce. Look for dry pasta that is murky, cracked soil rather than smooth.
Fresh pasta should also be cooked as your Italian grandma told you: with plenty of water, so it has room to transport. It will only take a minute or so in the boiling water before it is ready to mix with the sauce. For dry pasta, you don't need a lot of water - just submerge about an inch and you'll get premium sauce results. I cook my dry pasta until it's almost completely smooth, with a bit of chalk in the middle remaining - it will finish cooking in the sauce.
Either way, forget the recommendation of making the noodle water taste "salty like the sea". As Daniel demonstrated, seawater is too salty for pasta. About a tablespoon of Diamond Crystal kosher salt (or a teaspoon and a half of table salt) per quart is what you should aim for.

Once your pasta is cooked comes the big moment: adjust the consistency. I find it easier to sauce my pasta in a large skillet or slanted pan than in a large Dutch oven or stock pot. Pour the desired amount of sauce over the noodles you're cooking (usually a little less than you'd like) and make sure the sauce is hot when your pasta is done. Drain the noodles, save some of the starchy broth, then immediately add to the pan with the sauce and start stirring.
Now, look closely at how the sauce feels and how it sticks to the pasta. Do you see drops of oil inside the pan? Does the sauce stick to the noodles or slip? The sauce in the image above has been greatly reduced - see how the pasta is almost completely bare and how the peanuts rest on the steel of the pan with almost no liquid around them. ? This is when the noodle soup you ordered in advance comes into play.
Adding some of this starchy liquid to the pot and boiling/stirring vigorously will help the sauce emulsify and become creamy, so it adheres better to the pasta.

That's the feeling you're looking for - creamy and sassy. (After all, it's called "sauce" and no longer "crumbs that may be moist, but no longer have a pasta-like texture" for a reason.)
The ultimate key to perfectly textured noodles on the table? Don't wait to consume it!

From the moment the pasta reaches the fresh water, you've pressed the countdown lever and you and your guests should be better prepared to eat while the pasta is ready to eat. You see, because the pasta is hot, there are a few factors at play. First, you reduce the humidity, both the water absorbed into the pasta and the water evaporated into the atmosphere (the steam from the meals seemed great, but it no longer serves these meals). Second, the sauce cools and the longer it sits, the thicker the sauce becomes. Leave the noodles and sauce on for too long, and you might pick them up in a big lump.
Two questions might help here. First, you can reheat plates by placing them in a low-heat oven for a few minutes. The hot plate will keep the pasta and sauce warm. Second, train your guests to be rude. Tell them now not to sit there and watch the meal bleed because they don't have to be the first to help, or because they expect people to pour their wine for them. Eat the damn pasta - you've spent enough time perfecting this sauce!
Well, truth be told, you certainly didn't spend much time on the sauce, until Mr. Pressure was there, but your guests don't want to know about that, do they?

This has to be the best aspect running through their heads right now (or should I say it out of their mouth?).
Formula Events
- Activity: 60 minutes
- Total: 2h30
- Make: 8 to 10 servings
Element
- 1 cup (225 mL) homemade or store-bought low-sodium chicken broth
- 4 packets of powdered gelatin (1 ounce; 30g)
- 2 tablespoons (30ml) extra virgin olive oil
- 1/2 pound (225 g) finely chopped pancetta
- 1 large onion, thinly sliced (about 1 1/2 cup; 300g)
- 2 large carrots, finely chopped (about 1 cup; 200g)
- 2 large celery stalks, finely chopped (about 1 cup; 200g)
- 4 medium cloves of garlic, minced (about 4 teaspoons; 15g)
- 1/4 cup fresh sage leaves, chopped (about 1/4 ounce; 8 g)
- 1/2 cup fresh parsley leaves, chopped (about 1/2 ounce; 15 g), divided
- 1/2 pound (225 g) shredded chicken liver
- 2 pounds (900g) ground beef (about 20% cups)
- 1 pound (450g) ground pork shoulder (about 20% tons)
- Kosher salt and freshly ground black pepper
- 2 cups (450 ml) dry red wine
- 1 can (14 ounces; 400 g) tomato puree, preferably San Marzano
- 1 1/2 cups (350 mL) heavy cream, divided
- 2 bay leaves
- 3 ounces (80g) finely grated parmesan
- 1 to 2 tablespoons (15 to 30 ml) Vietnamese or Thai fish sauce
- 1/4 cup fresh basil leaves, chopped (about 1/4 ounce; 8g)
- 1 1/2 pounds (700 g) pappardelle or tagliatelle, or 1 pound (450 g) dry penne
- Finely ground parmesan
Direction
Place stock in 1 cup of liquid and sprinkle with gelatin. Set aside.
Heat olive oil in a pressure cooker over medium to high heat until simmering. Add pancetta and cook for dinner, stirring often, until pancetta is golden and crispy, about 12 minutes. Add onion, carrot, celery, garlic, sage, and half of parsley and prepare dinner, stirring, until tender but no longer brown, about 8 minutes. Turn the heat up to excess, add the chicken liver and cook for dinner, stirring until the liver is no longer pink, about five minutes.

Add pork and pork, season with salt and pepper just prepared for dinner, use a wooden spoon or potato masher to stir and shred until meat is no longer pink, about 10 minutes. Continue cooking, stirring occasionally, until the extra liquid evaporates and the beef begins to sizzle, about 25 minutes.
Add inventory and mix gelatin, wine, tomatoes, 1 cup heavy cream, and bay leaf. Cover and cook dinner over high pressure (12-15 psi) for 30 minutes. Release the tension and remove the cover. Cook over low heat until thickened and emulsified, 30 to 45 minutes longer.

Add 1/2 cup thick cream, Parmesan cheese, fish sauce, basil and parsley and mix well. Bring to a boil, stirring constantly to create an emulsion. Season to taste with salt and pepper. Bolognese can be refrigerated and stored in an airtight container in the refrigerator for at least one week.

To serve: Heat bolognese in a large saucepan until simmering. Set aside. Cook pasta in a large pot of salted water until slightly thickened. Drain, set aside 1/2 cup of cooking liquid. Transfer to a large skillet or saute pan and add 3/4 of the sauce, next to the cooking water. Heat, stirring gently until sauce thickens and coats pasta, about 30 seconds. Transfer to a serving bowl and coat with sauce. Serve immediately, leaving extra Parmesan cheese on the table.

